IXL and ILEARN Checkpoints and Study Plans

Wondering how to use IXL study plans to help prepare your students for ILEARN and ILEARN Checkpoints?  Here is a video to share what IXL can...

Tuesday, November 1, 2022

Using Reveal Math Online for Assessments (tools editor)

Math Tools Editor-
When using Reveal Assessments Online, Be Aware that the "Instructions" indicate that students should be clicking Alt+F10 to get the math tools. THIS IS NOT NECESSARY-

INSTEAD, Students should select the 
symbol and use the math symbols within this editor window to type equations, fractions, etc.
*NOTE: students who use the letter "x" as a multiplication sign instead of the "x" in the editor are marked incorrect when graded by Reveal online.


Friday, October 14, 2022

Canvas Speedgrader: Store your most used comments for repeated use

Looking to save time while grading and giving feedback to students in Canvas?

Canvas will store your most used comments in SpeedGrader so you can quickly select and post them for useful feedback.

Here is how you can store your comments:
1. Log into Canvas, click on an assignment, and then select SpeedGrader from the right side of the assignment screen.
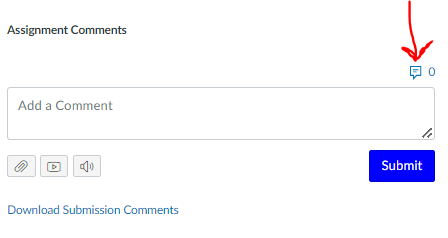
2. Click on the tiny icon above the comment box.


3. Type your most used comments into the box near the bottom, then click on "+add to library".
4. Comments will generate in a list along the right side bar. You can edit or delete the comment from the list any time.

Here is how to insert the most used comments into SpeedGrader:
1. 
Log into Canvas, click on an assignment, and then select SpeedGrader from the right side of the assignment screen.
2. 
Click on the tiny icon above the comment box.


3.Click on the comment you would like to insert. The comment will automatically paste into the comment box. You can always edit or delete the comment.
4. Click on the blue SUBMIT button to share the comment with the student.

Need more ideas for feedback?

 6 Tips for Fast, Effective Feedback video


Additionally, 

There is a new feature in Canvas that allows you to edit and store your most used images.
Click here for a short tutorial video (3min)


Tuesday, September 27, 2022

Canvas: How to Generate Pairing Codes so Parents can make their own Parent Canvas account

 Are parents asking you for Canvas "Pairing Codes"?

First, what is a Canvas "pairing code"?
When parents make their own Canvas account, a "pairing code" is needed to link the student to the parent.  This code allows the parent access to the student's Canvas courses while logged into their Canvas account. A parent can not view their child's Canvas courses without this code.

How do parents get that "pairing code"?
This flyer explains how parents can LOG IN AS THEIR STUDENT to access this code on their own.

Also, teachers can generate the "pairing codes" for their student roster, and safely get them to the parents. Please NOTE: the "pairing codes" expire 7 days after a teacher downloads them. Multiple codes will generate for each student. This is because each code is a one-time-use. So students with more than 1 parent with a Canvas parent account, can link to the student's Canvas courses. Here are the directions for downloading the "pairing codes".
NOTE: These codes should be kept SECURE and shared only with the parent or guardian directly. 

Where do parents put this "pairing code"?
When parents want to make their own Canvas account, they click on the "Parent of a Canvas User?"  link on the main login page. This will prompt them to enter their parent email address, a password they would like to use, and a pairing code to pair them with a student.


Wednesday, September 21, 2022

Clever 2022 Updates


Clever Features for 2022


How to add your students to your Clever "Teacher" Page: (2 Options)
Option 1
1. Click on the card labeled "your name's Page"


2. Click on "Share My Teacher Page" on the left side of the screen.


3. Select "One or More Classes" from the menu. Choose your Homeroom, then select Update.


Option 2
1. Click on your teacher page card from your Clever dashboard.
2. Click on "Create & Share" in the lower right corner.
3. Select "Share Page".
4. Choose "One or More Classes", then select Homeroom from the drop down box.
5. Click "Update".


How to add Apps to the Clever "Teacher" page:

  1. Select the "Create and Share" from the bottom-right of your Teacher Page.
  2. Select App.
  3. A menu will display to the right where you can search for the application name, then click on it.
  4. Select "Install_______" to add it to your Teacher Page.


How to add Links to the Clever "Teacher" page:

  1. Select the "Create and Share" from the bottom-right of your Teacher Page.
  2. Select LINK.
  3. Type or Paste in the URL, add a name for the link, select an image to represent the link on the dashboard, then click "Add link".


How to add a personalized picture to Clever Page:
1. Click on the settings wheel in the upper right corner of the teacher page card.
2. Select "Personalize".
3.Choose a stock image or upload one of your own. You can also select the header color.
4. Click SAVE.


How to push an app out to all student Chromebooks: (2 options)
Option 1
1. Click on the "Classes" tab at the top of your Clever dashboard.
2. Find your homeroom card and click "Launch an app".

3. Be sure that your students are logged into Clever and looking at the Clever dashboard before you select an app to launch.
4. Click on the image of the app you wish to launch on all student computers.
5. You will get a green message that says "You have successfully launched an app".
6. You can also follow steps 1 and 2 to automatically log all of your students out of an app.

Option 2
1, Click on your Teacher page card from the Clever dashboard.
2. Click on "Login Tools" on the left pane.
3. Select "Launch an App".
4. Click on the icon for the app you wish to launch.


Tuesday, September 13, 2022

Reveal Online Math Component

 At this month's PD, the elementary technology trainers showcased Redbird for grades K-2 and ALEKS for grades 3&4.  During this time, we showcased some of the features that teachers and students can utilize to maximize the programs' abilities.  Below, you will find the content presented during the PD time if you were unable to attend or just want to revisit the information.  

K-2 Redbird Information


3&4 ALEKS Presentation

Click here to view these slides


Tuesday, September 6, 2022

Savvas integration with Canvas


To assign a Savvas activity in Canvas:

Click here for printable directions

To begin, log into Canvas, and access your course.  

Click on "Assignments", then +Assignment to create a new assignment.

Add all of the usual details to the assignment; including title, description, sync to SIS, etc.

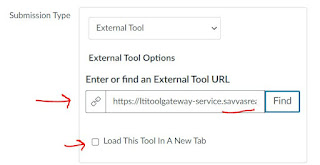
In the "Submission Type" drop box, select EXTERNAL TOOL. Then click FIND.


Next, scroll until you see "Savvas Realize Course Connect". Click on it.


The first time you use this feature, you will be asked if you want to connect to Savvas. Select "District Login".

Next, you will see your Savvas textbooks. Select either Investigations Math, Words Their Way, or for grades 3-4 Social Studies.

Navigate through the online program as you normally would to find an activity you wish to assign.
Once you have found the activity, click on the blue box "+Import".

*NOTE: you can only assign one Savvas activity per Canvas assignment.

Next, click on IMPORT in the upper right corner of the screen.


When the screen returns to your Canvas window, click on SELECT.


Now you will notice the link in the box reflects a Savvas activity. You can select for this assignment to open in a new window for students to make the activity as large as possible on their screen.


From here, continue to scroll down and complete the assignment details, such as "Assign To" and "Due Date".
Click on "Save" or "Save and Publish".


When the student logs into Canvas and selects the assignment,

The first time, they will be prompted to connect to their Savvas account. Students should select "District Login".

Then the assignment will load for them.

Notice that students will have the same tools as they have had using the Savvas website to complete the activity.
When students have completed the activity, they will click on the blue "Submit Assignment" button.

Student work can be viewed by the teacher by either going to "Speedgrader" in Canvas OR by going to your Teacher account in Savvas.


Monday, August 29, 2022

FLIPGRID IS NOW FLIP

 Flipgrid has a new name, Flip!  It is has a new name and look, but still the same product teachers know and love.  They have taken teacher and user feedback over the years and made creative improvements.  I know, you are wondering is it still safe to use in the classroom?  According to Deb McFadden, Principal Head of Trust and Safety, "Flip is safe, and we're working hard every day to stay that way."  Click here to see how it is safe, inclusive, accessible, and free!

Click here for the entire article.


Watch the video below to Meet Flip: Social Learning for the Classroom & Beyond


Watch the video below for product updates.